
 Setup Guide
 VPN Use Cases
 Account & Billings
 Video Tutorials
 Faq's
Faq's
How To Setup Ivacy VPN on Windows 7 Manually
 60432 Views
 October 10, 2019
 admin
admin No Comments
 11
11Before you begin, please make sure that:
- You have a working internet connection
- A Premium Ivacy VPN account. If you haven’t subscribed yet, click here to subscribe for Ivacy VPN
You can select the respective tab for the desired protocol.
- From the ‘Start’ menu, click on ‘Control Panel’
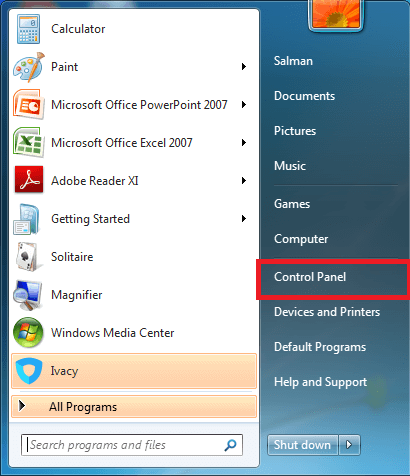
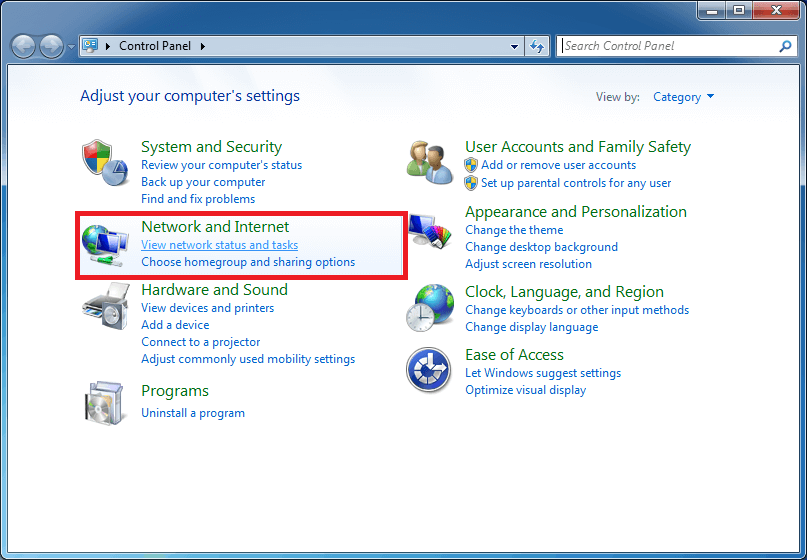
- In ‘Control Panel’ you see various icons listed under the ‘Adjust your computer’s settings’ section. Click on ‘View network status and tasks’ under the ‘Network and Internet’ icon.
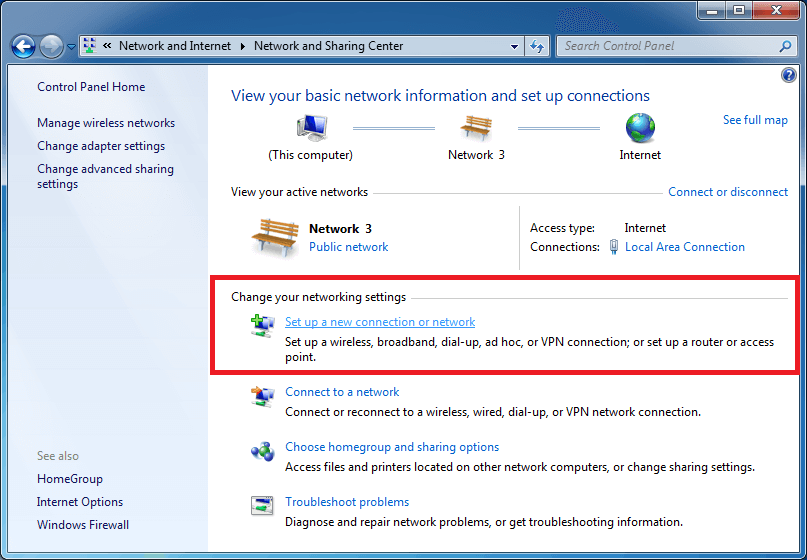
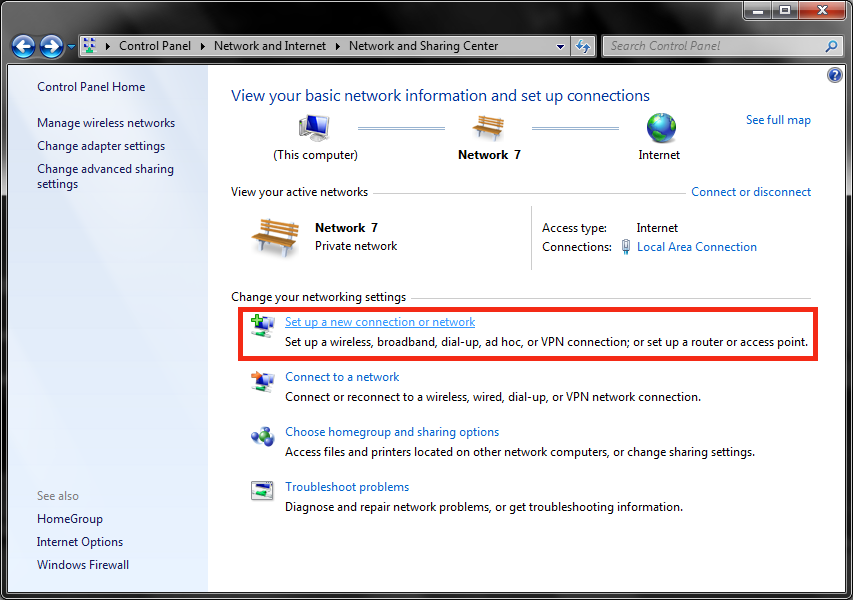
- Under the ‘Change your networking settings’ section, click on ‘Set up a new connection or network’.
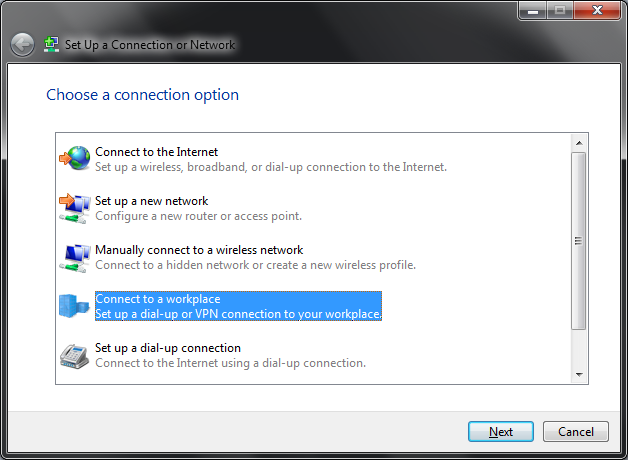
- A new window will open up. From that window, you have to choose a connection option. Select the ‘Connect to a workplace’ option and click ‘Next’.

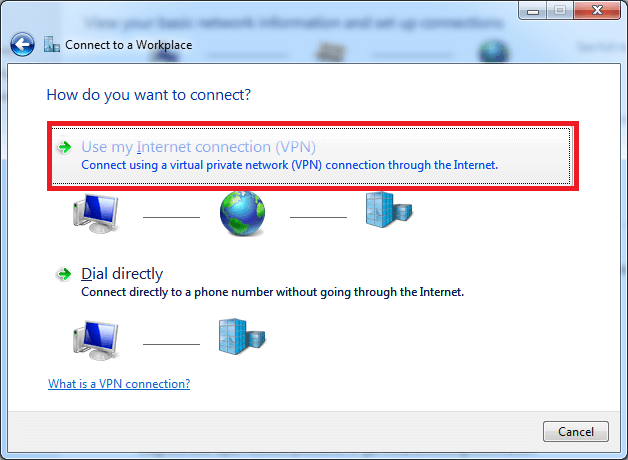
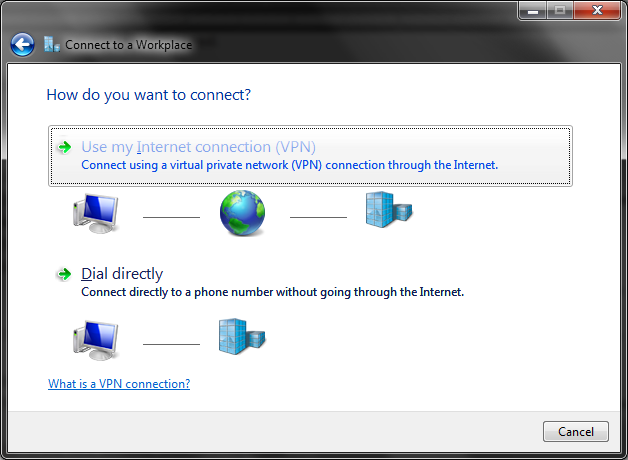
- A new window will open. In that particular window, you are asked a question: ‘How do you want to connect?’. There are two options given. One is ‘Use my Internet connection (VPN)’ and the other one is ‘Dial directly’. Click on ‘Use my Internet connection (VPN)’.
- Another new ‘Type the Internet address to connect to’ window will open up. This window provides you with two blank spaces. You are required to give an ‘Internet address’ and a ‘Destination name’.In the ‘Internet address’ field, you should provide a server name that you desire to use. (the list of all server addresses can be found here).
In the ‘Destination name’ field you should type, ‘Ivacy PPTP’.
Check ‘Allow other people to use this connection’ option and ‘Don’t connect now, just set it up so I can connect later’ option.
Leave ‘Use a smart card’ option unchecked. Click ‘Next’.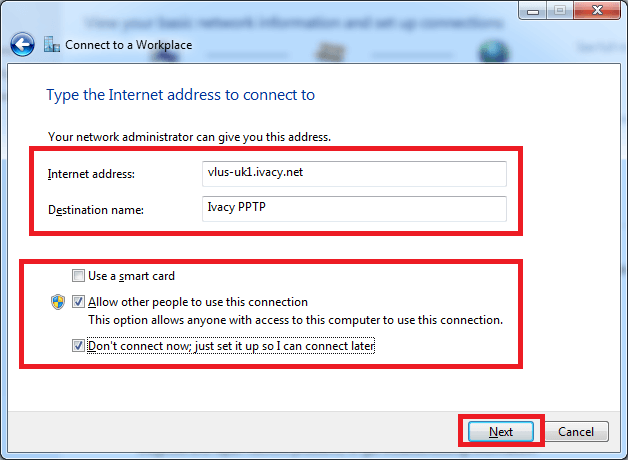
- Now, the ‘Type your username and password’ window will open up.
– In the ‘Username’ field, you should type the username / email.
– In ‘Password’ field, you should type the password.
– Check ‘Remember this password’ option.
– Leave the ‘Show characters’ option unchecked.
– Click Create.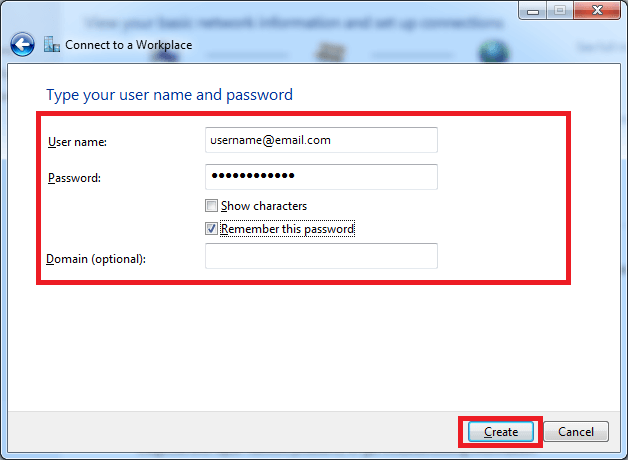
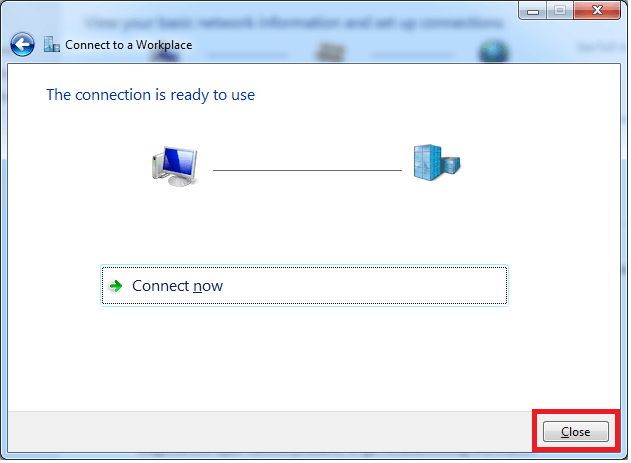
- This time, ‘The connection is now ready to use’ window will open up. Don’t click on ‘Connect now’ option. Click on ‘Close’.
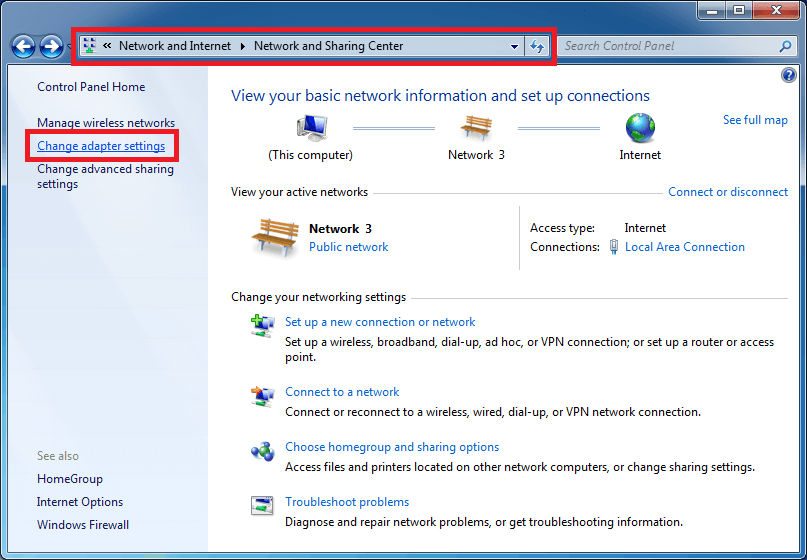
- Return to ‘Control Panel > Network and Internet > Network Sharing Center’. On the left, there is a side bar. Under the ‘Control Panel Home’ section, click on ‘Change adapter settings’ option.
- Right click on the ‘Ivacy PPTP’ icon. Click on ‘Properties’.
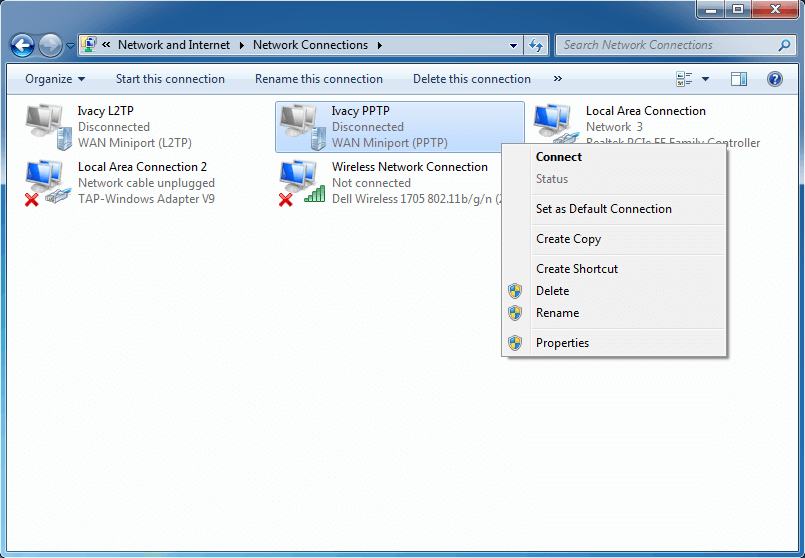
- A dialog box will open up. Click on ‘Security’ tab.
– Under the ‘Security tab’, you should select the ‘Type of VPN’ from a dropdown menu.
– Select ‘Point to Point Tunneling Protocol (PPTP)’.
– Leave all the other settings as they are.
– Select ‘Allow these protocols’ option.
– Check ‘Challenge Handshake Authentication Protocol (CHAP)’ option, and Microsoft CHAP Version 2 (MS-CHAP v2) option. Leave the other options, ‘Unencrypted Password (PAP)’ and ‘Automatically use my Windows logon name and password, (and domain, if any)’, unchecked.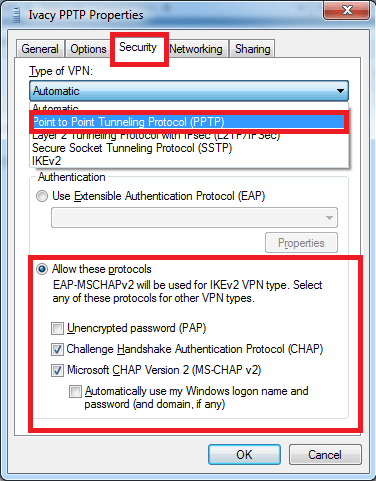
- Go to ‘Networking’ tab.
– Uncheck ‘Internet Protocol (TCP / IPV6)’ option; and ‘File and Printer Sharing for Microsoft Networks’ option.
– Keep the other two options; ‘Internet Protocol (TCP / IPV4)’ and ‘Client for Microsoft Networks’ checked.
– Click ‘OK’.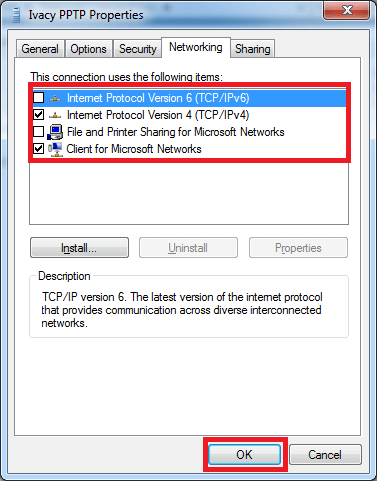
- In adapter settings, you will see ‘Ivacy PPTP’ icon. Double click on that particular icon.
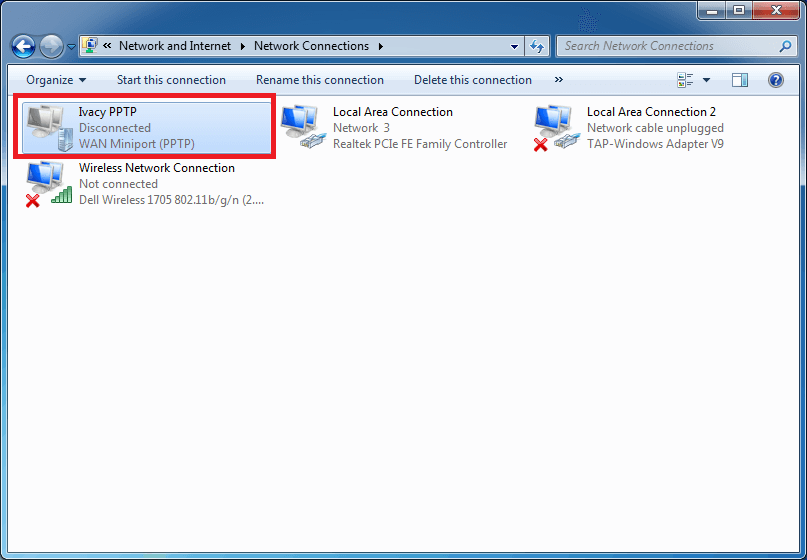
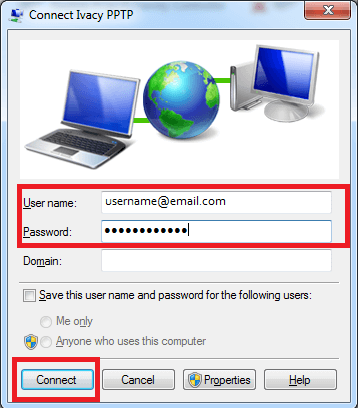
- A new window will open up. Type in the ‘Username / Email’ and ‘Password’ in the two fields and Click Connect.
- From the ‘Start’ menu, click on ‘Control Panel’.
- In ‘Control Panel’ you see various icons. Click on ‘View network status and tasks’ under the ‘Network and Internet’ icon.
- Under the ‘Change your networking settings’ icon, click on ‘Set up a new connection or network’.
- A new window will open up. From that window, you have to choose a connection option. Select the ‘Connect to a workplace’ option and click ‘Next’.
- A new window will open. In that particular window, you are asked a question: ‘How do you want to connect?’. There are two options given. One is ‘Use my Internet connection (VPN)’ and the other one is ‘Dial directly’. Click on ‘Use my Internet connection (VPN)’.
- Another new ‘Type the Internet address to connect to’ window will open up. This window provides you with two blank spaces. You are required to give an ‘Internet address’ and a ‘Destination name’.
In the ‘Internet address’ field, you should provide a server name that you desire to use. (the list of all server addresses can be found here).
In the ‘Destination name’ field you should type, ‘Ivacy L2TP’.
Check ‘Allow other people to use this connection’ option and ‘Don’t connect now, just set it up so I can connect later’ option.
Leave ‘Use a smart card’ option unchecked. Click ‘Next’.
- Now, the ‘Type your username and password’ window will open up.
– In the ‘Username’ field, you should type the username / email.
– In ‘Password’ field, you should type the password.
– Check ‘Remember this password’ option.
– Leave the ‘Show characters’ option unchecked.
– Click Create. - This time, ‘The connection is now ready to use’ window will open up. Don’t click on ‘Connect now’ option. Click on ‘Close’.
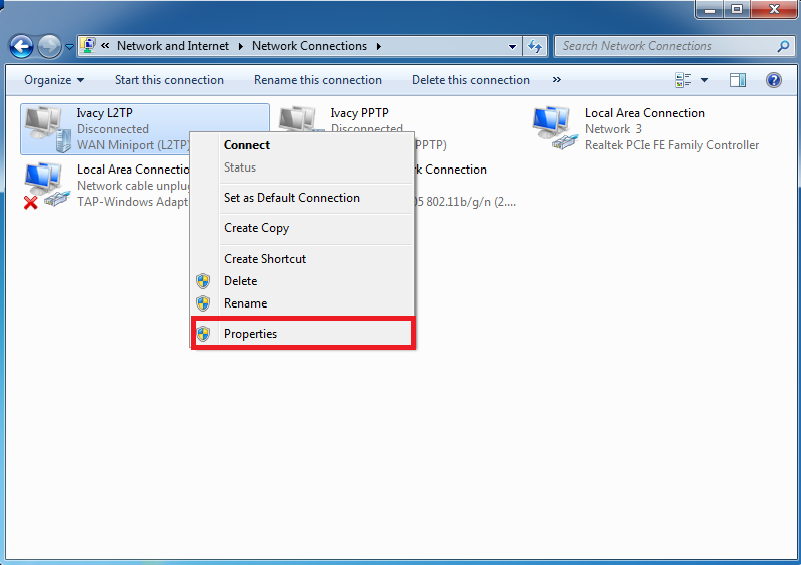
- Return to ‘Control Panel > Network and Internet > Network Sharing Center’. On the left, there is a side bar. Under the ‘Control Panel Home’ section, click on ‘Change adapter settings’ option.
- Right click on the ‘Ivacy L2TP’ icon and click on ‘Properties’.
- A dialog box will open up. Click on ‘Security’ tab.
– Under the ‘Security tab’, you should select the ‘Type of VPN’ from a dropdown menu.
– Select ‘Layer 2 Tunneling Protocol (L2TP) with IPSec’.
– Select ‘Allow these protocols’ option.
– Check ‘Challenge Handshake Authentication Protocol (CHAP)’ option, and Microsoft CHAP Version 2 (MS-CHAP v2) option. Leave the other options, ‘Unencrypted Password (PAP)’ and ‘Automatically use my Windows logon name and password, (and domain, if any)’, unchecked.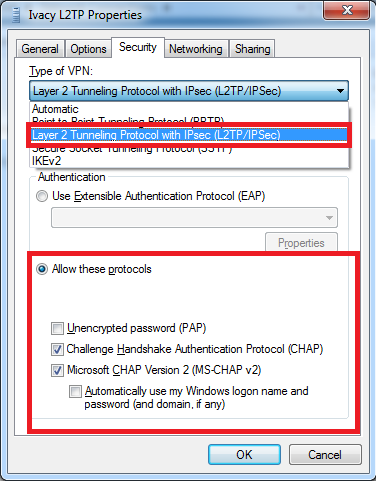
- Click on ‘Advanced Settings’ tab, just below the ‘Type of VPN’ dropdown menu.
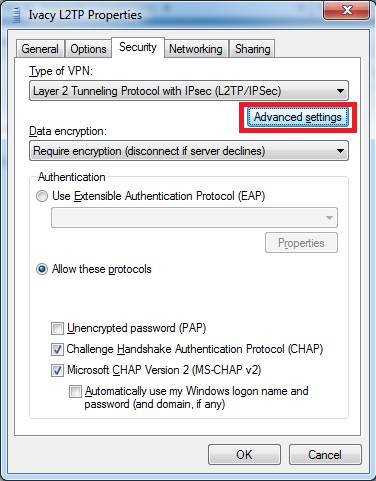
- A new window ‘L2TP’ will open up. In that particular window, check the option, ‘Use preshared key for authentication.’ In the ‘Key’ field, type ‘12345678’. Keep the other option, ‘Use certificate for authentication’ unchecked. Click ‘OK’.

- Go to ‘Networking’ tab.
– Uncheck ‘Internet Protocol (TCP / IPV6)’ option; and ‘File and Printer Sharing for Microsoft Networks’ option.
– Keep the other two options; ‘Internet Protocol (TCP / IPV4)’ and ‘Client for Microsoft Networks’ checked.
– Click ‘OK’.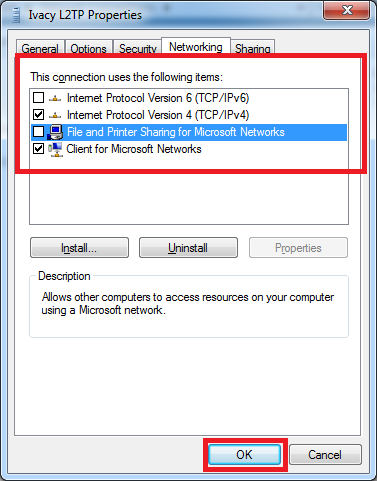
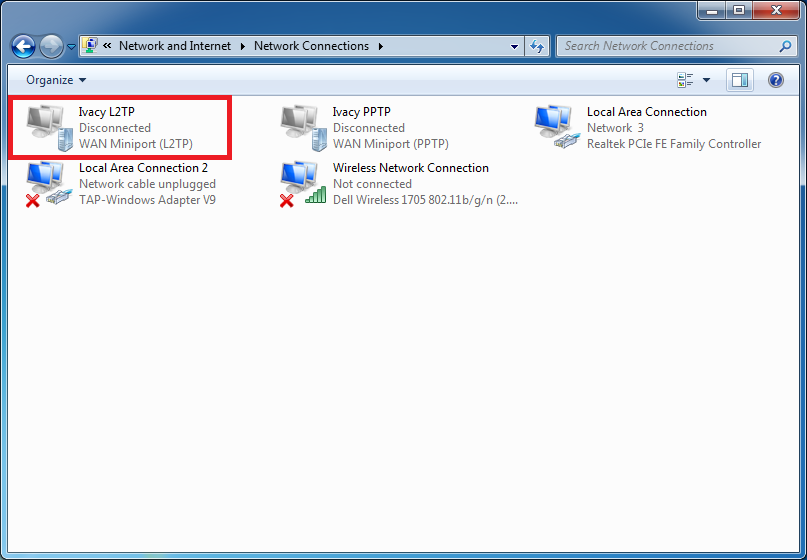
- In Network Connections, you will see ‘Ivacy L2TP’ icon. Double click on that particular icon.
- A new window will open up. Type in the ‘Username / Email’ and ‘Password’ in the two fields provided.
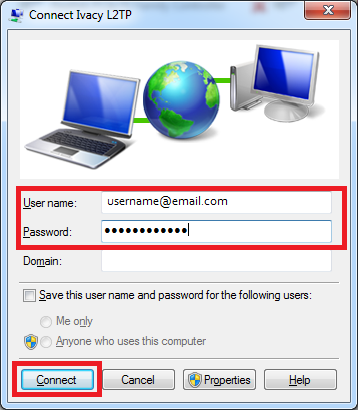
- Click Connect.
- Right click on ‘LAN Network’ / ‘WiFi’ icon on the taskbar of your system. Click on ‘Network Sharing Center’.

- Under the ‘Change your network settings’ section, click on ‘Set up a new connection or network’.
- In the ‘Choose a connection option’ window, click on ‘Connect to a workplace’ option. Then click ‘Next’.
- The ‘How do you want to connect?’ window will open up. Select ‘Use my internet connection (VPN)’ option.
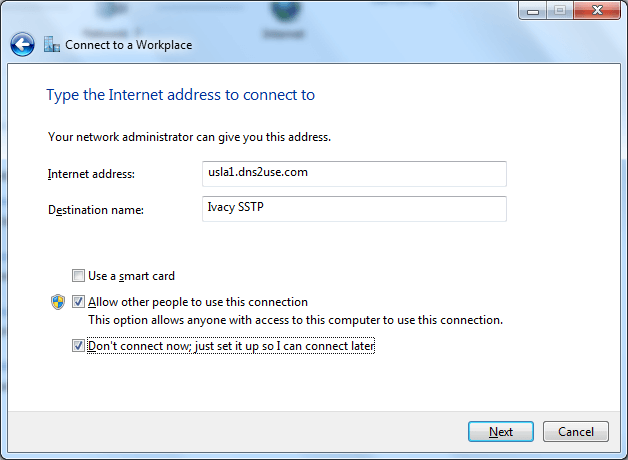
- A new window will open up. In this ‘Type the internet address to connect to’ window, you are provided with two empty fields. In the ‘Internet address’ field, type the name of the server (Ivacy server list) that you want to use. For instance, usla1.dns2use.com. In the ‘Destination name’ field, you should write ‘Ivacy SSTP’. Keep ‘Allow other people to use this connection’ and ‘Don’t connect now, just set up so I can connect later’ checkboxes, checked. Keep the ‘Use a smart card’ checkbox, unchecked. Hit ‘Next’.
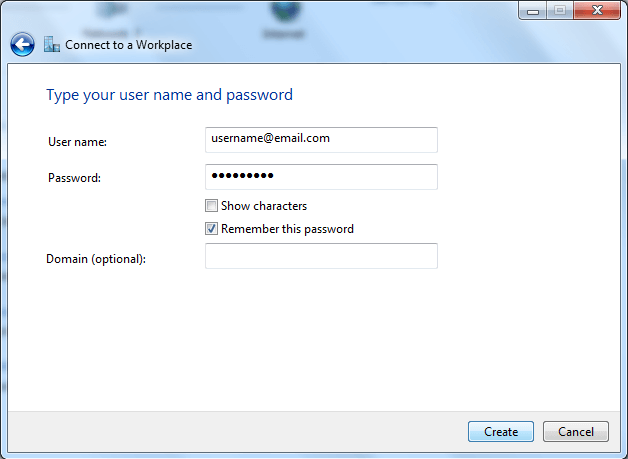
- In the ‘Type your username / email and password’ window. Keep the ‘Remember this password’ checkbox, checked. Then click on ‘Create’.
- In ‘The connection is ready to use’ window, hit ‘Close’.

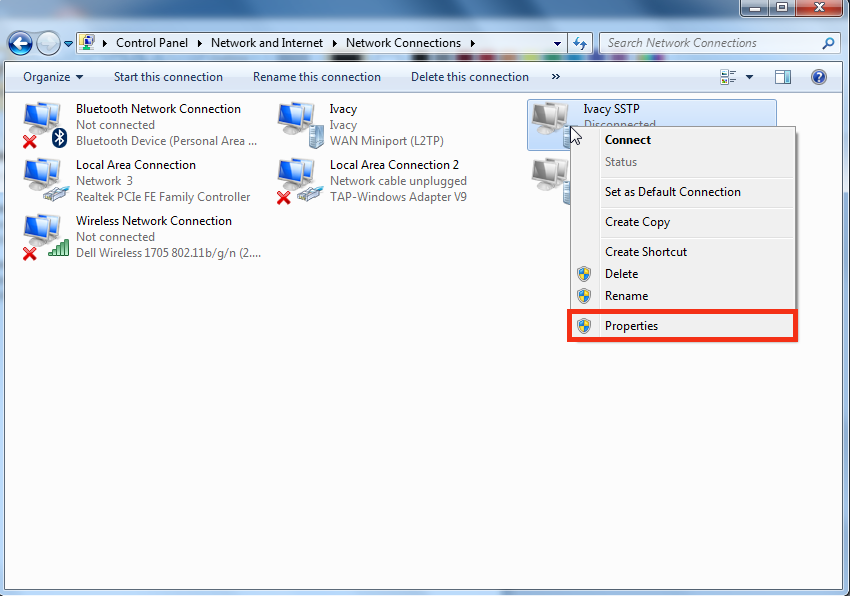
- Go back to ‘Control Panel > Network and Internet > Network and Sharing Center’. On the left hand side, you can see ‘Control Panel Home’. Click on ‘Change adapter settings’.
- Right click on ‘Ivacy SSTP’ set up icon. Then click on ‘Properties’.
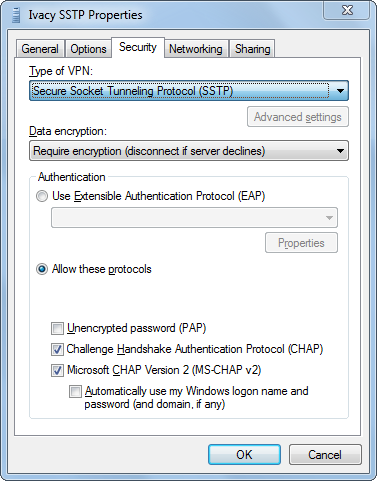
- A new window will open up. Go to ‘Security’ tab. From the ‘Type of VPN’ dropdown menu, select the ‘Secure Socket Tunneling Protocol (SSTP)’. From the ‘Data encryption’ dropdown menu, you should select the encryption method that you desire to use. Keep the ‘Unencrypted password’ and ‘Automatically use my Windows logon name and password (and domain, if any)’ options, unchecked. Do check the ‘Challenge Handshake Authentication Protocol (CHAP)’ and ‘Microsoft CHAP Version 2 (MS-CHAP v2)’ checkboxes.
- Go to ‘Networking’ tab. Uncheck ‘Internet Protocol Version 6 (TCP/IPv6)’ and ‘File and Printer Sharing for Microsoft Networks’. Keep the other two options, ‘Internet Protocol Version 4 (TCP/IPv4)’ and ‘Client for Microsoft Networks’, checked. Click ‘OK’.

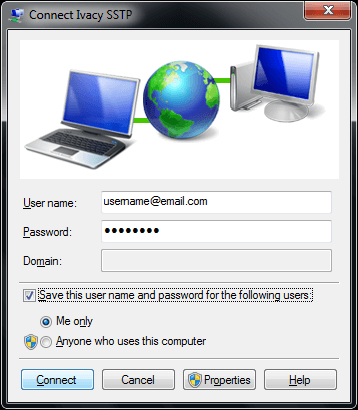
- Double click on the ‘Ivacy SSTP’ icon. A new window ‘Connect Ivacy SSTP’ will open up. Type-in the ‘Username / Email’ and ‘Password’ in the respective fields. Check the option, ‘Save this username and password for the following users’. Click the ‘Me only’ button. Click on ‘Connect’.
Installing IvacyVPN OpenVPN
- You must first download and install OpenVPN installer for Windows 7. You can download the installer from here. (Click here to Download File).
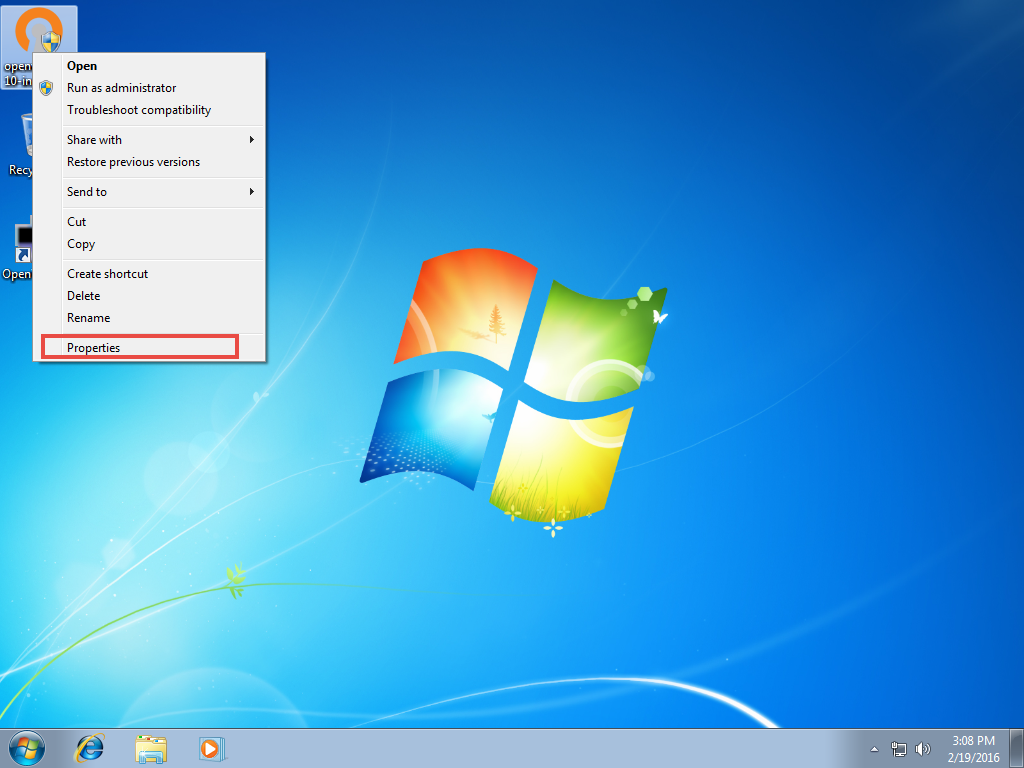
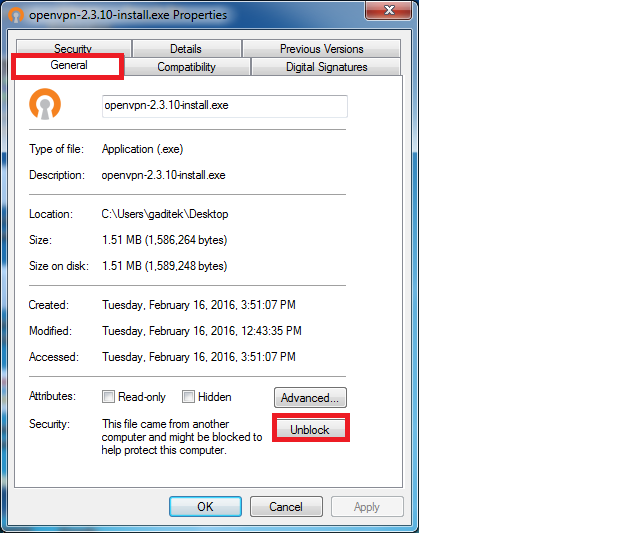
- Right click on ‘OpenVPN installer’ icon. Click on ‘Properties’.
- Navigate to ‘General’ tab. Hit ‘Unblock’, ‘Apply’ and then ‘OK’.
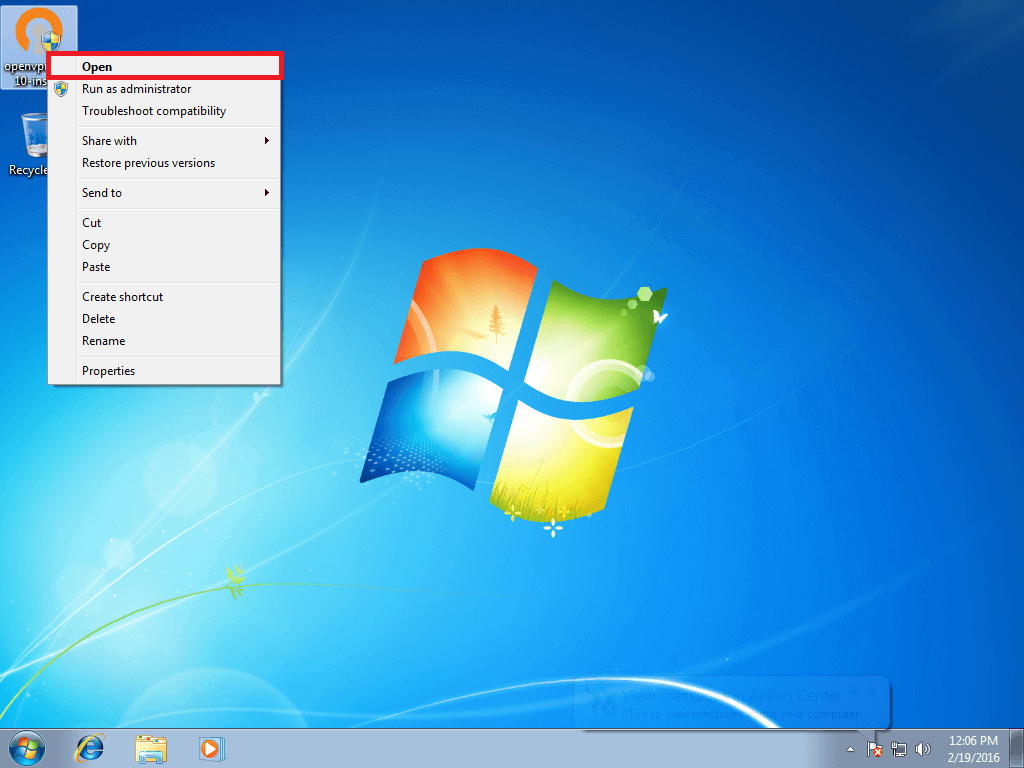
- Double click again on ‘OpenVPN installer’ icon. You can also right click on ‘OpenVPN installer’ and select ‘Open’ option.
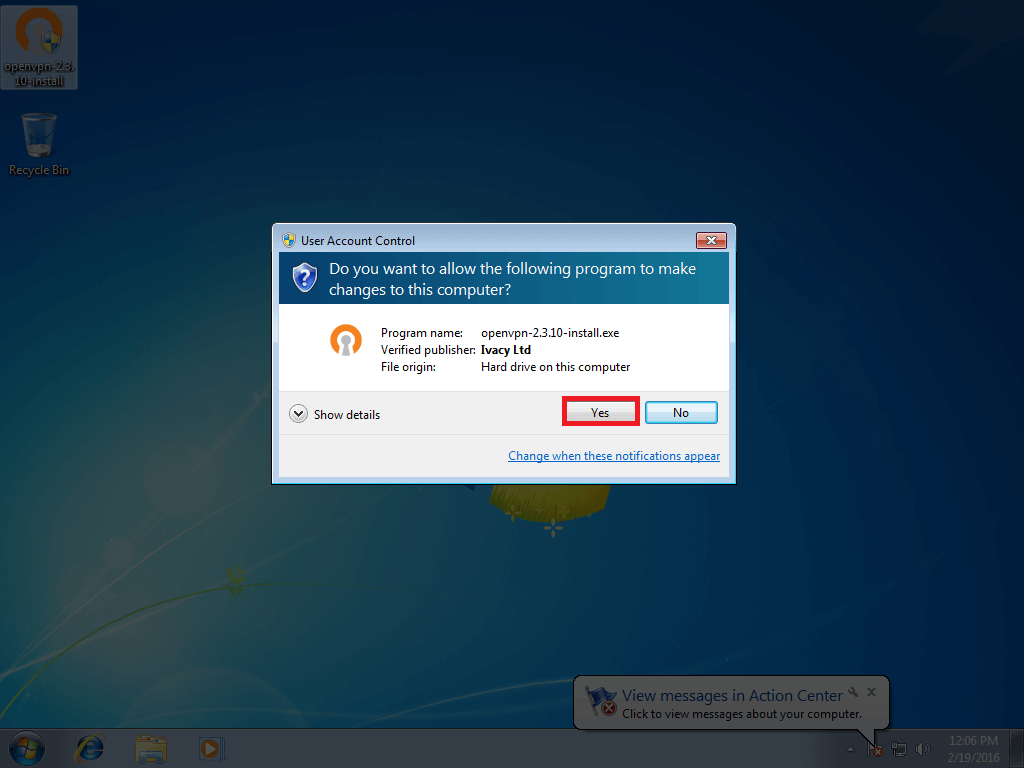
- The ‘User Account Control’ dialog box will open up. Click ‘Yes’ to begin installation.
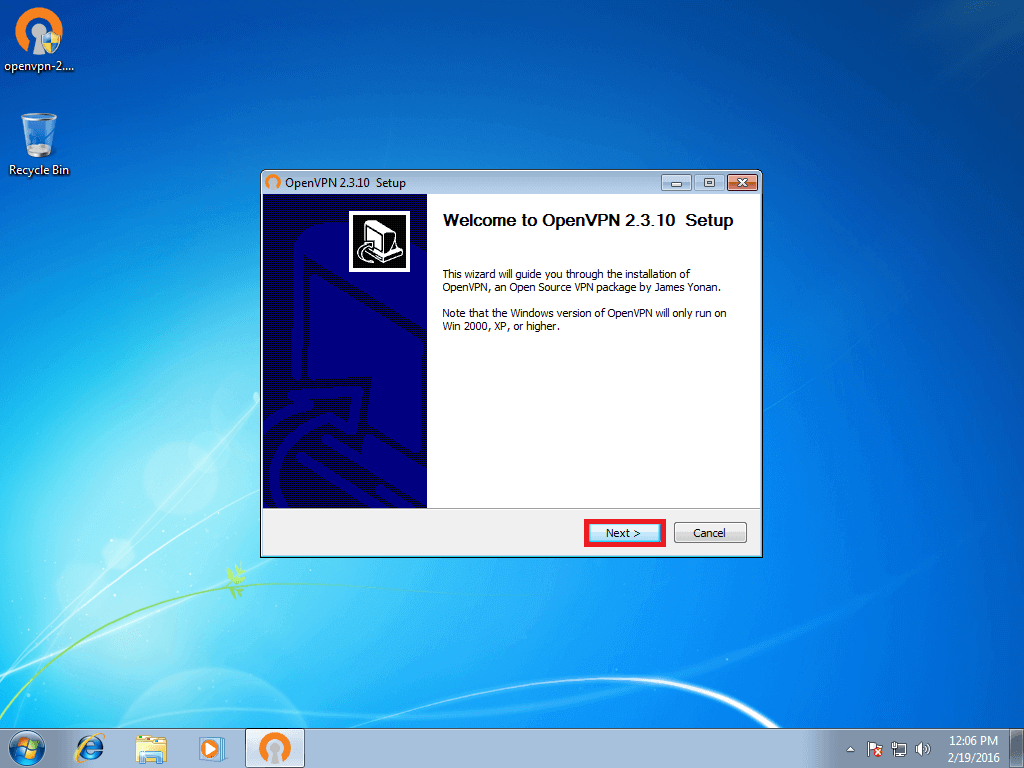
- The ‘OpenVPN setup Wizard’ window will open up. Hit ‘Next’ button.
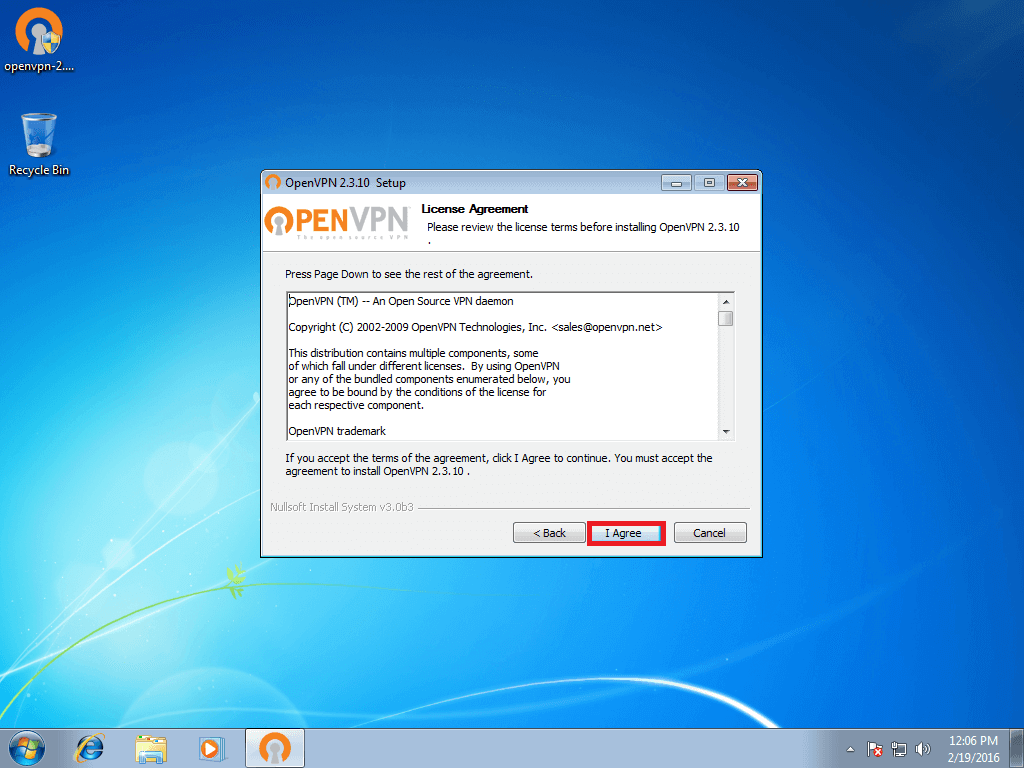
- Now, click on ‘I Agree’ button.
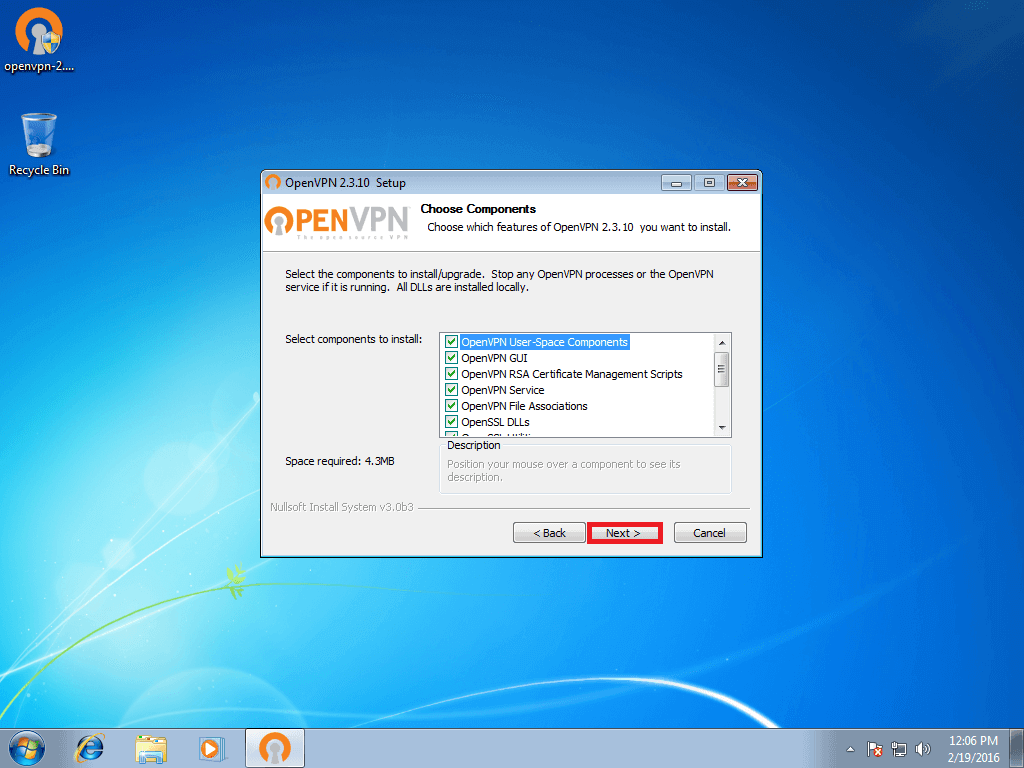
- A new window will open up. Click on ‘Next’ button.
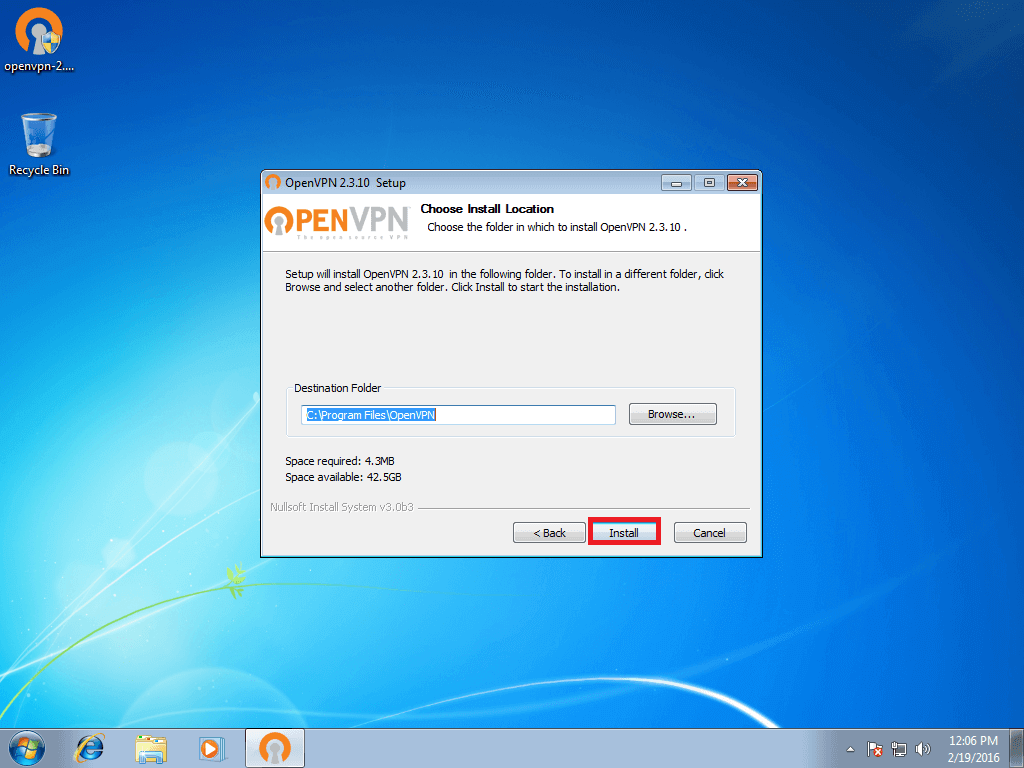
- The ‘Choose Install Location’ window will open up. Click on ‘Install’ button. The installation process will begin.
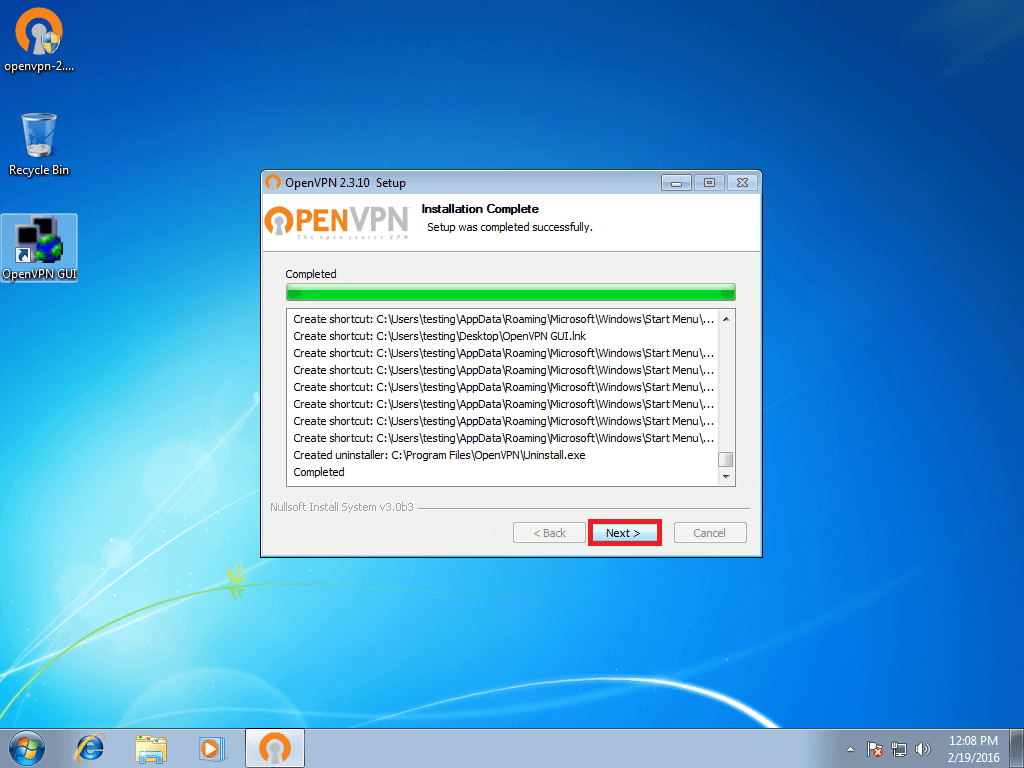
- Once the installation process finishes, click ‘Next’ button. In case the ‘Windows Security’ dialog box opens up, check ‘Always trust software from Ivacy Limited’ checkbox. Hit the ‘Install’ button.
- Uncheck the ‘Show Readme’ checkbox. Hit the ‘Finish’ button.

Connect to IvacyVPN OpenVPN
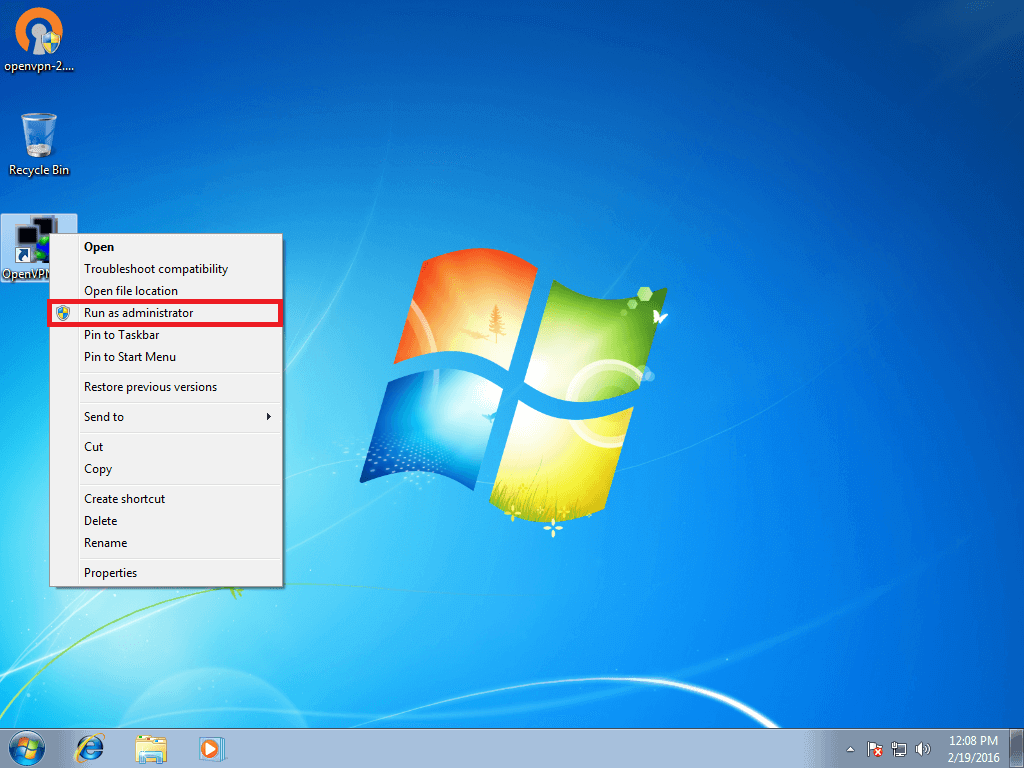
- Right click on ‘OpenVPN GUI’ icon. Click on ‘Run as administrator’ option.
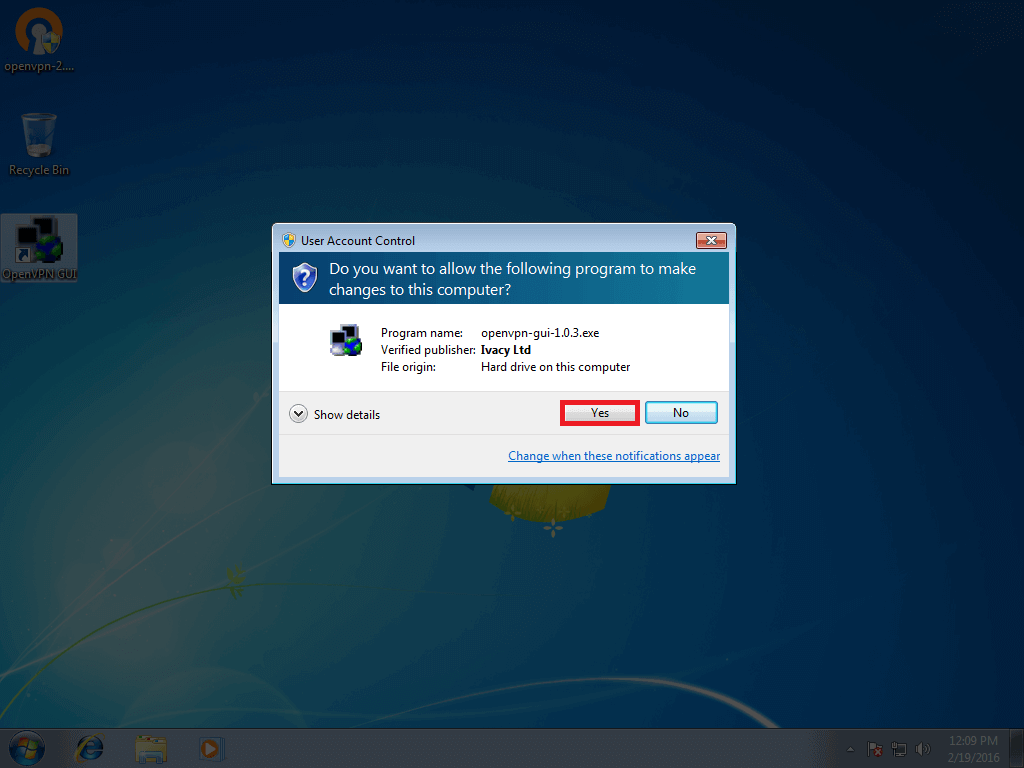
- The ‘User Account Control’ dialog box will open up. Hit the ‘Yes’ button.
- From the ‘System Tray’, click on ‘OpenVPN’ icon. Select the desired server, you want to use. Select ‘Connect’.

- The ‘OpenVPN User Authentication’ dialog box will open up. Type your ‘username / email’ and ‘password’ in the respective fields. Hit ‘OK’ button.

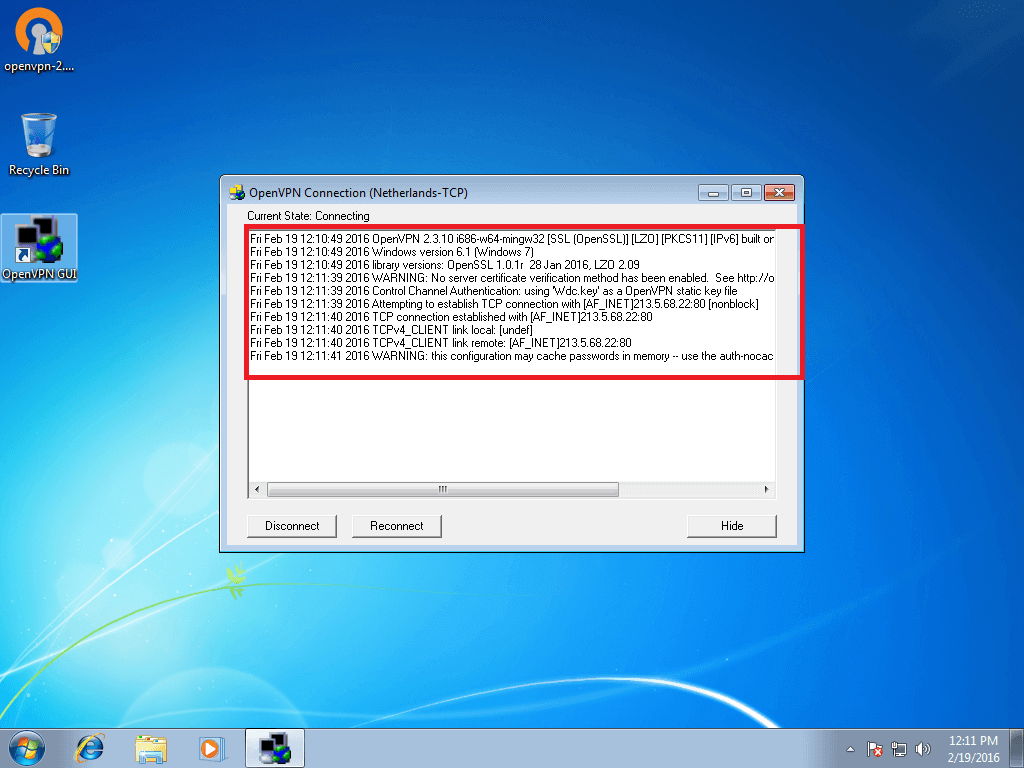
- Wait for a while. After a few minutes, the ‘IvacyVPN OpenVPN’ connection will be established.
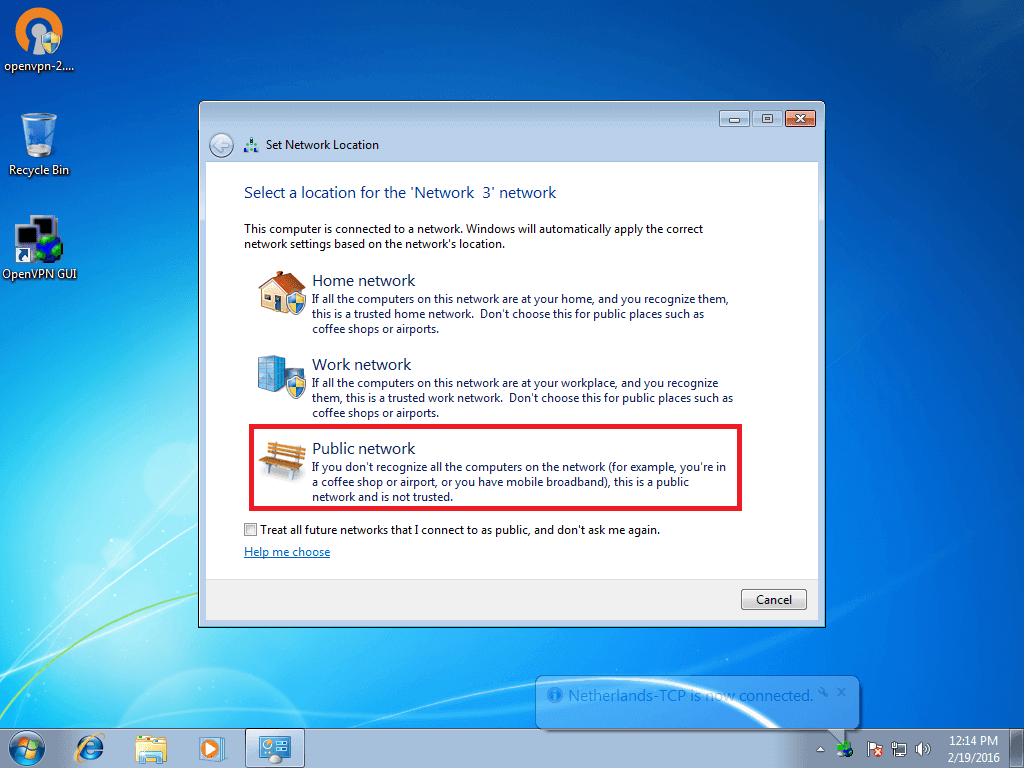
- You are now connected to Ivacy VPN OpenVPN. A new ‘Select a Location for Network’ window will open up. Select ‘Public Network’ option.
- The ‘Network location is now Public’ window will open up. Hit the ‘Close’ button.
 Enjoy privacy with Ivacy!
To Disconnect
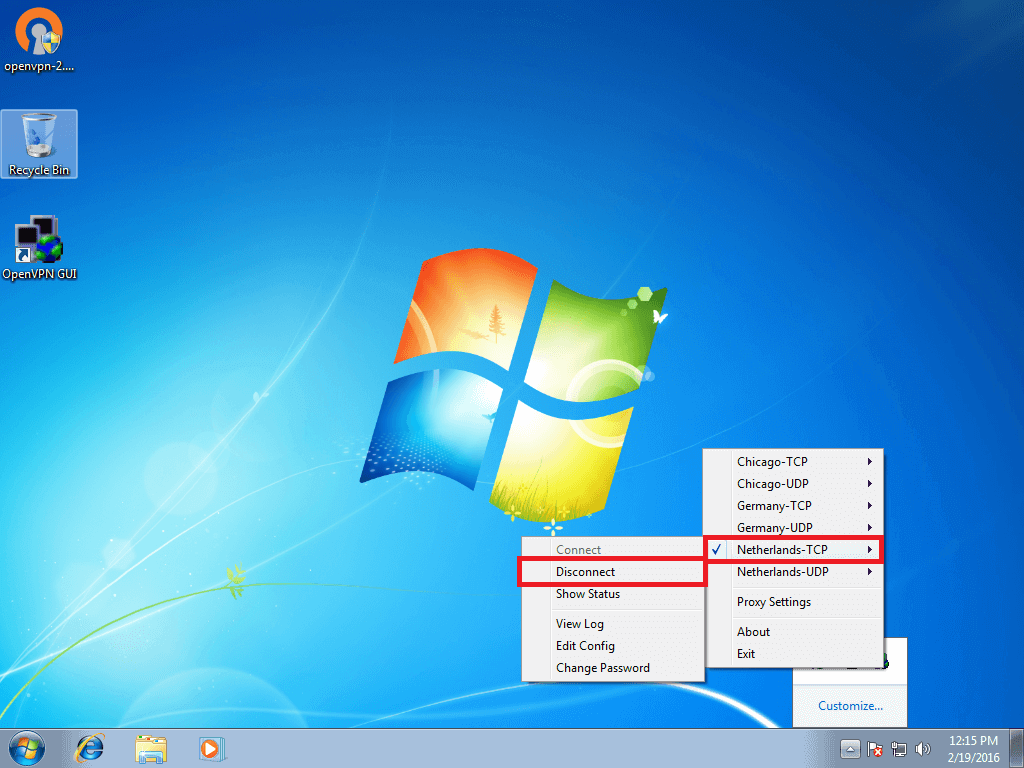
- Navigate to ‘System Tray’ and right click on it. Go to the ‘connected server’, and select ‘Disconnect’.
To Save Account Details
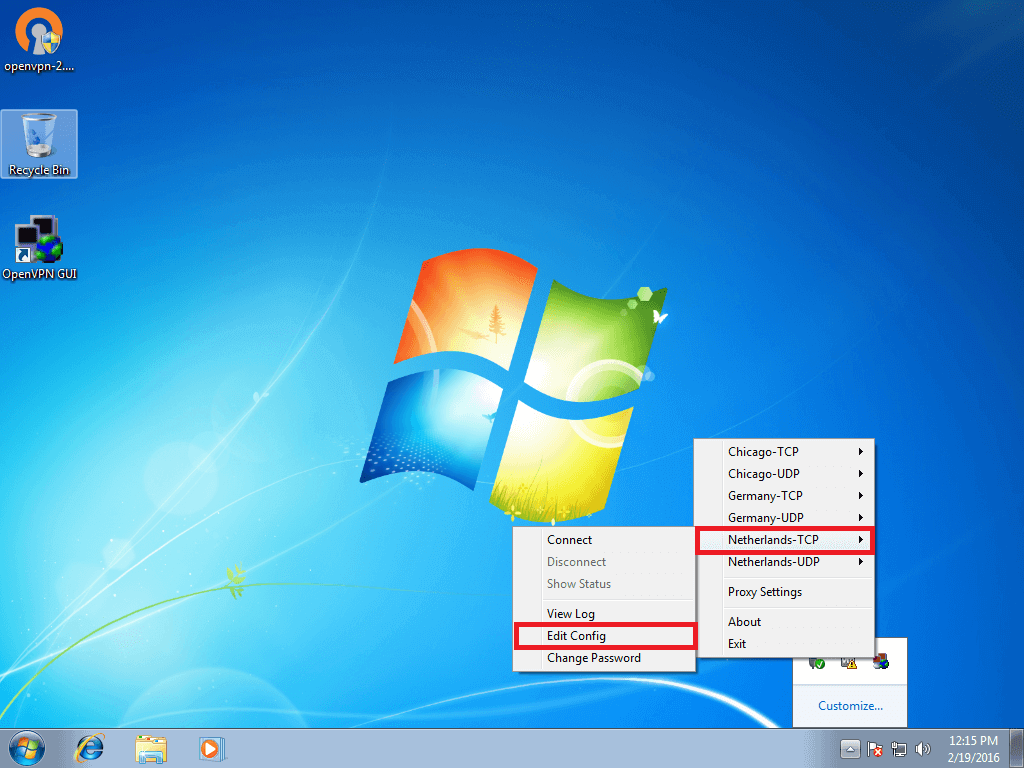
- Go to ‘System Tray’ and right click on it. Select the ‘server’ that you desire to use. Select the ‘Edit Config’ option.
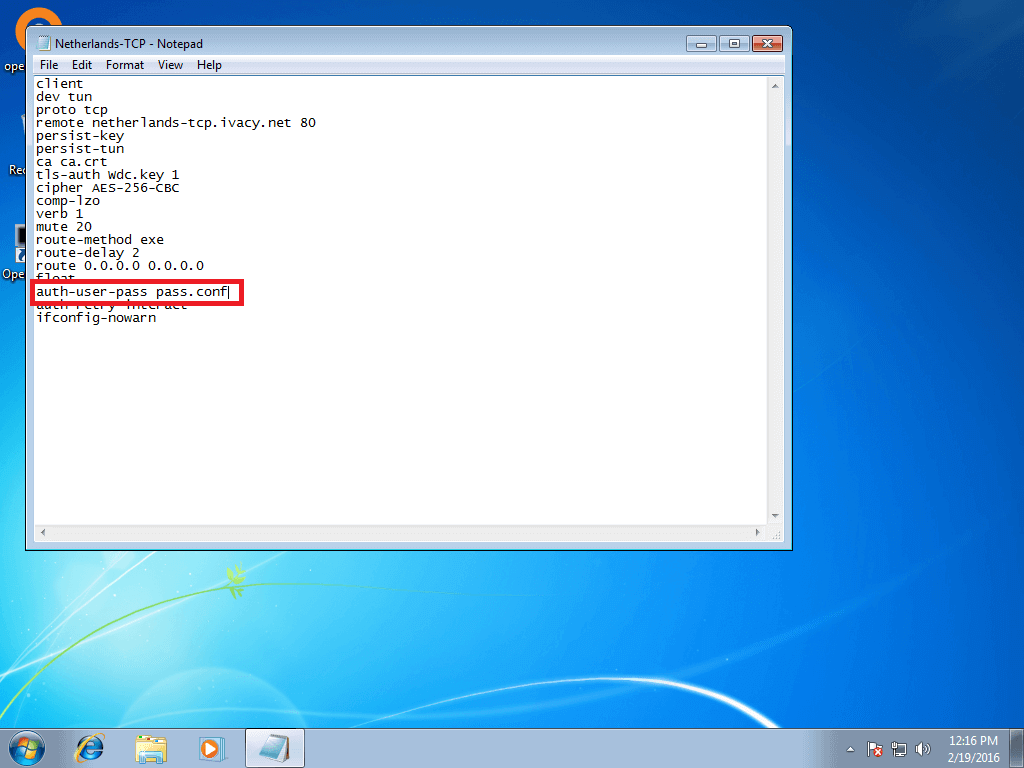
- A new document will open up. Add ‘pass.conf’ against the ‘auth-user-pass parameter’. Save the document.
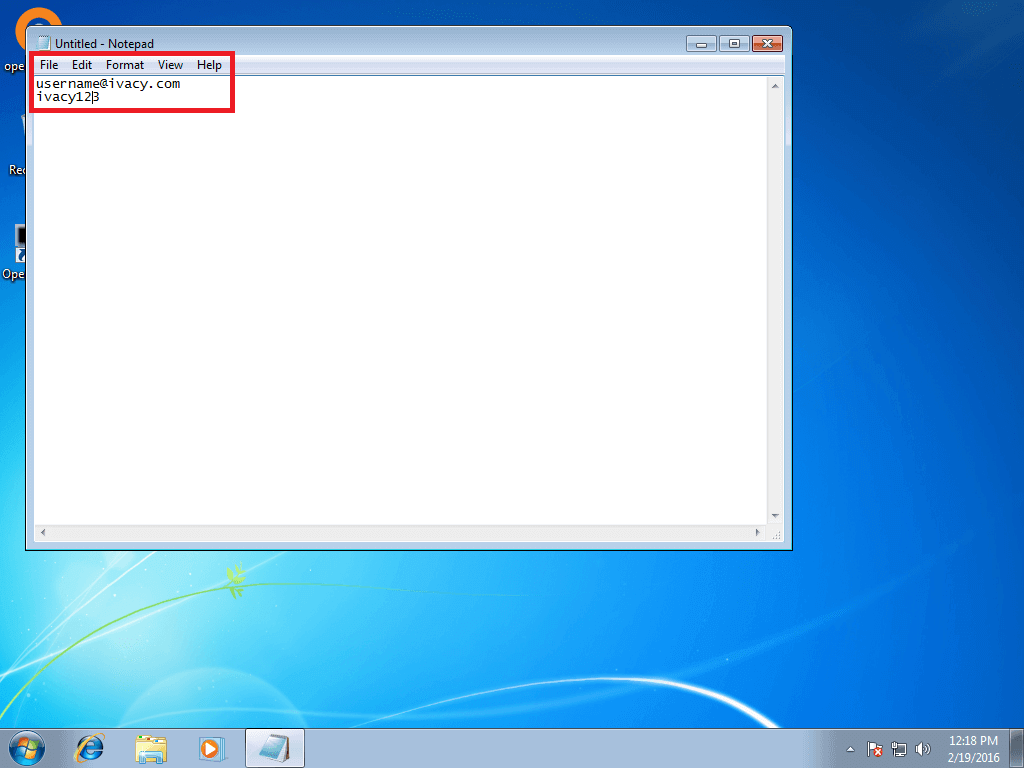
- Open ‘Notepad’. Write ‘username / email’ in the first line. Write ‘password’ in the second line. Save this file as ‘pass.conf’ in a folder.
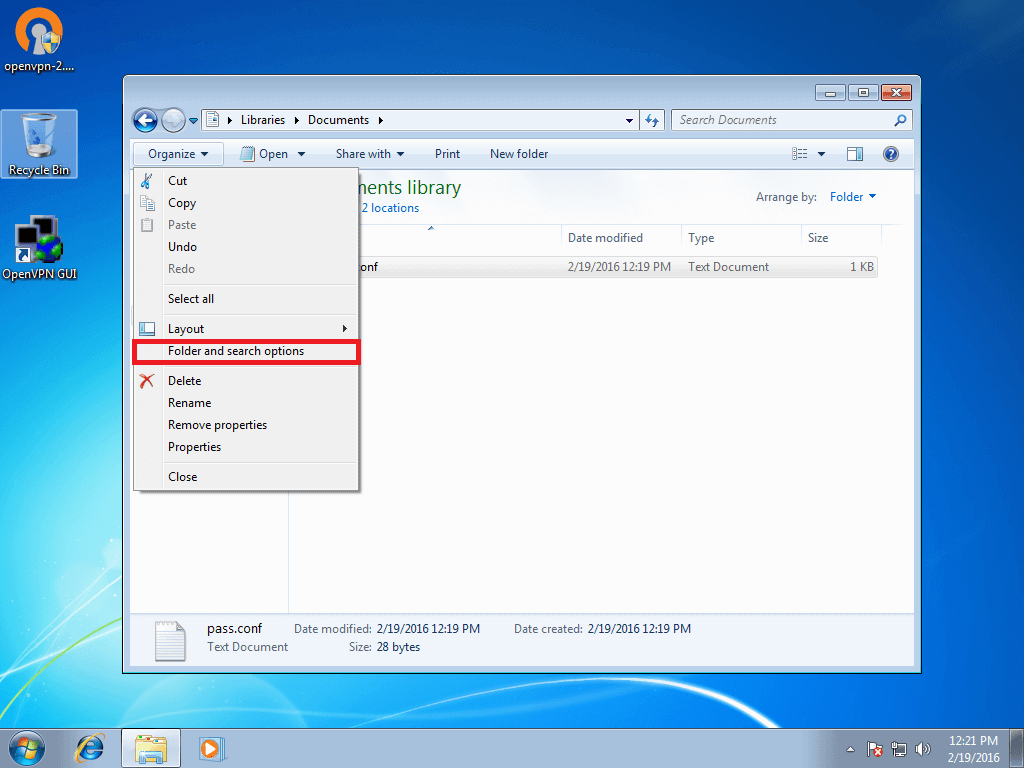
- Open the folder, where you have just saved the ‘pass.conf’ file. Navigate to ‘Tools’ tab. From the menu, select ‘Folder and search options’.
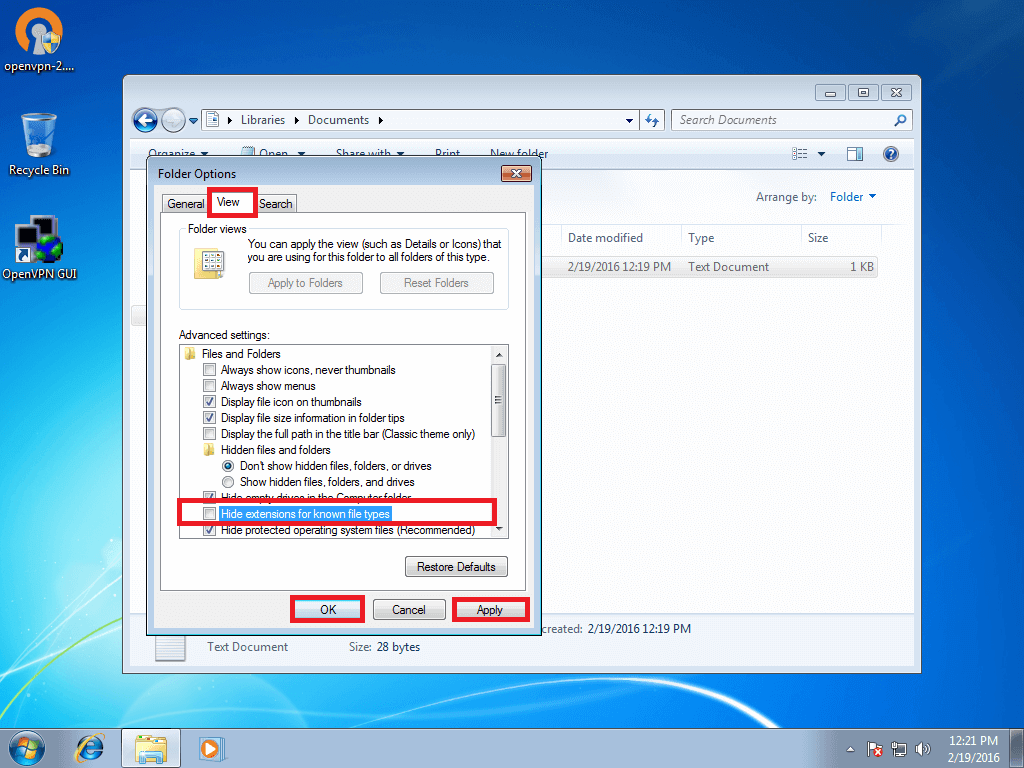
- The ‘Folder options’ window will open up. Click on the ‘View’ tab. Uncheck the ‘Hide extensions for known file types’ checkbox. Now, click on ‘Apply’ button. Then click on ‘OK’ button.
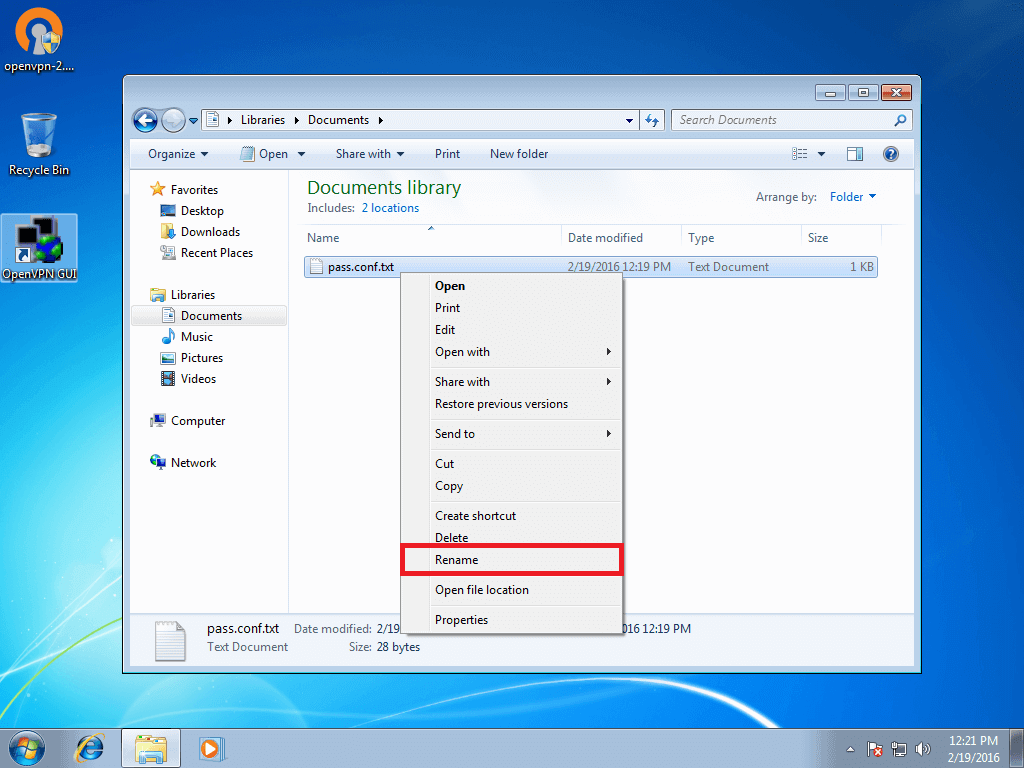
- Go to ‘Document Library’. Right click on the ‘pass.conf.txt’ file. Rename it.
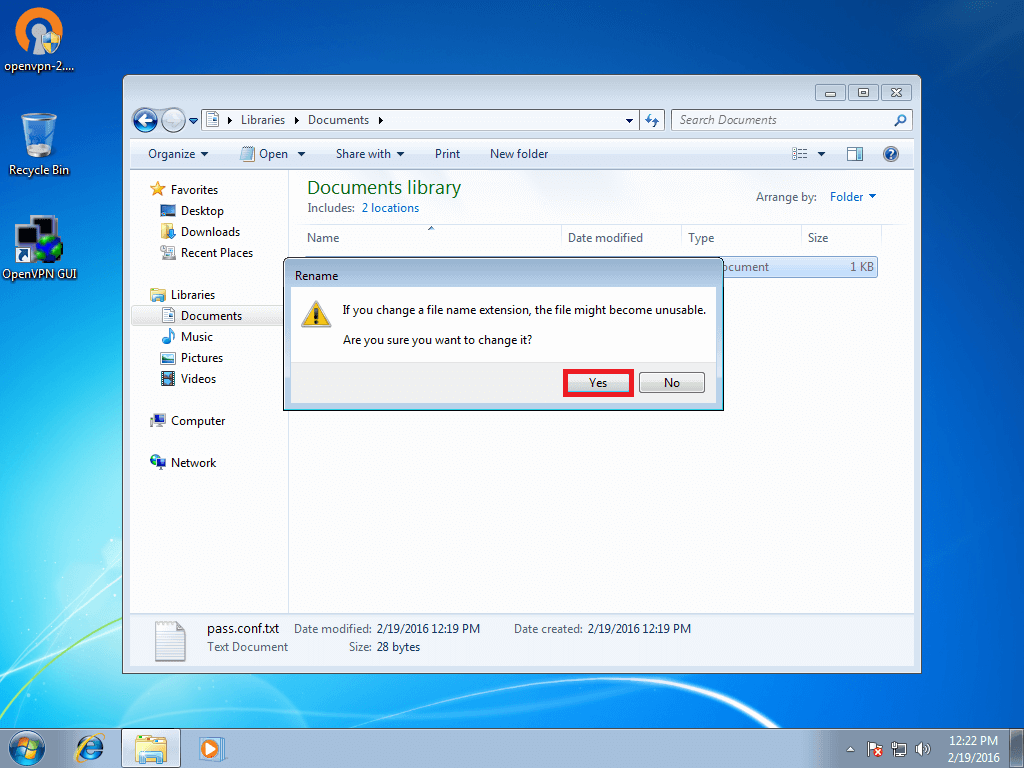
- Remove ‘.txt’ from the ‘pass.conf.txt’ file name. Hit ‘Enter’ key. A dialog box, ‘Are you sure you want to change it’, will open up. Click on ‘Yes’ button.
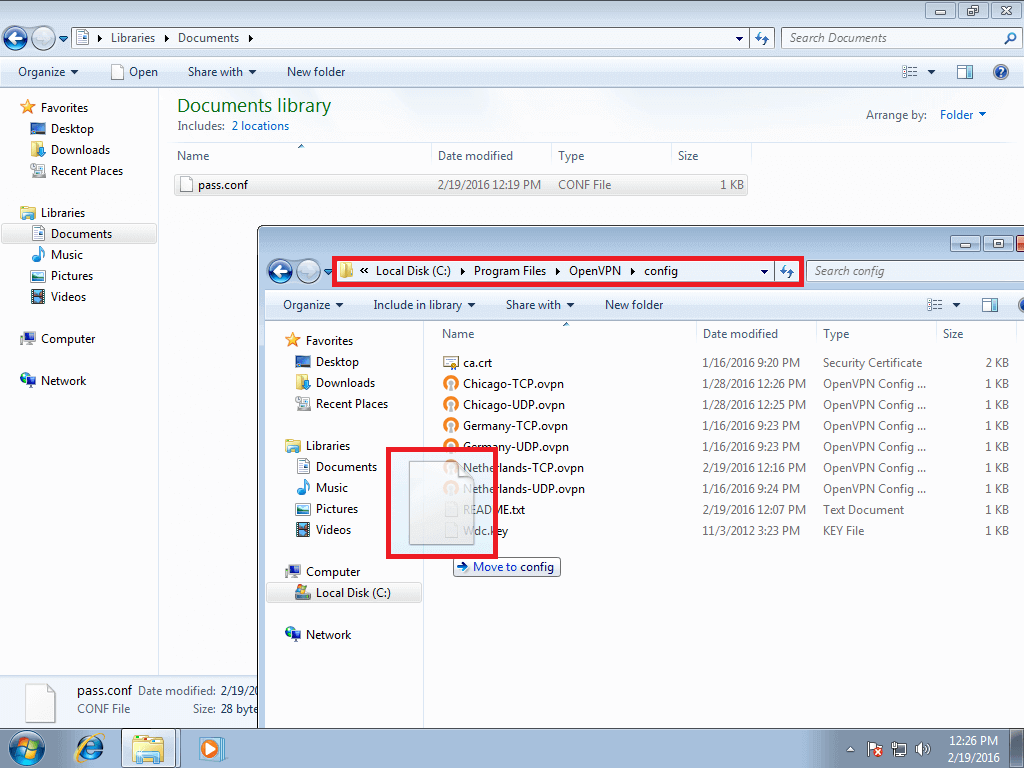
- Open the ‘OpenVPN installation folder’ (C:\Program Files\OpenVPN\config). Copy or drag the ‘pass.conf’ file into the ‘config folder’.
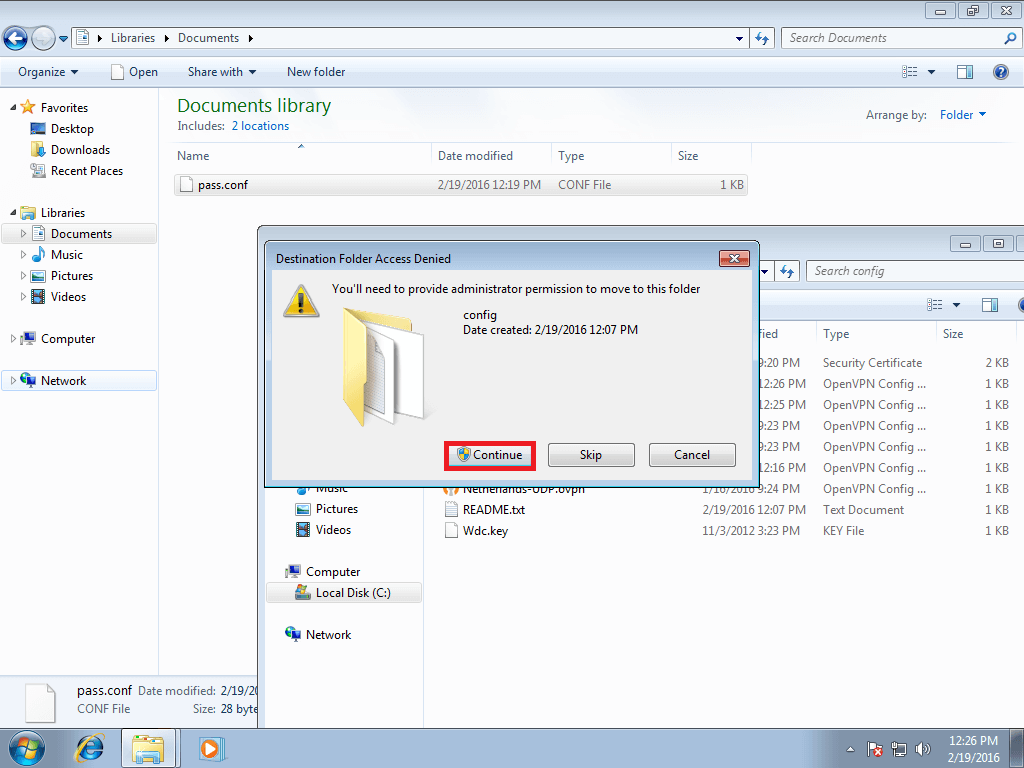
- The ‘Destination Folder Access Denied’ dialog box will open up. Hit the ‘Continue’ button.
 Now your account details have been saved.
Repeat Step 20, Step 21 and Step 22 to edit all the servers.
- From the ‘Start’ menu, click on ‘Control Panel’
- In ‘Control Panel’ you see various icons listed under the ‘Adjust your computer’s settings’ section. Click on ‘View network status and tasks’ under the ‘Network and Internet’ icon.
- Under the ‘Change your networking settings’ section, click on ‘Set up a new connection or network’.
- A new window will open up. From that window, you have to choose a connection option. Select the ‘Connect to a workplace’ option and click ‘Next’.
- A new window will open. In that particular window, you are asked a question: ‘How do you want to connect?’. There are two options given. One is ‘Use my Internet connection (VPN)’ and the other one is ‘Dial directly’. Click on ‘Use my Internet connection (VPN)’.
- Another new ‘Type the Internet address to connect to’ window will open up. This window provides you with two blank spaces. You are required to give an ‘Internet address’ and a ‘Destination name’.
In the ‘Internet address’ field, you should provide a server name that you desire to use. (the list of all server addresses can be found here).
In the ‘Destination name’ field you should type, ‘Ivacy IKEV’.
Check ‘Allow other people to use this connection’ option and ‘Don’t connect now, just set it up so I can connect later’ option.
Leave ‘Use a smart card’ option unchecked. Click ‘Next’. - Now, the ‘Type your username and password’ window will open up.
In the ‘Username’ field, you should type the username / email.
In ‘Password’ field, you should type the password.
Check ‘Remember this password’ option.
Leave the ‘Show characters’ option unchecked.
Click Create. - This time, ‘The connection is now ready to use’ window will open up. Don’t click on ‘Connect now’ option. Click on ‘Close’.
- Return to ‘Control Panel > Network and Internet > Network Sharing Center’. On the left, there is a side bar. Under the ‘Control Panel Home’ section, click on ‘Change adapter settings’ option.
- Right click on the ‘Ivacy IKEV’ icon. Click on ‘Properties’.

- A dialog box will open up. Click on ‘Security’ tab.
Under the ‘Security tab’, you should select the ‘Type of VPN’ from a dropdown menu.
Select ‘IKEv2’.
Leave all the other settings as they are.
Select ‘Allow these protocols’ option.
Check ‘Challenge Handshake Authentication Protocol (CHAP)’ option, and Microsoft CHAP Version 2 (MS-CHAP v2) option. Leave the other options, ‘Unencrypted Password (PAP)’ and ‘Automatically use my Windows logon name and password, (and domain, if any)’, unchecked.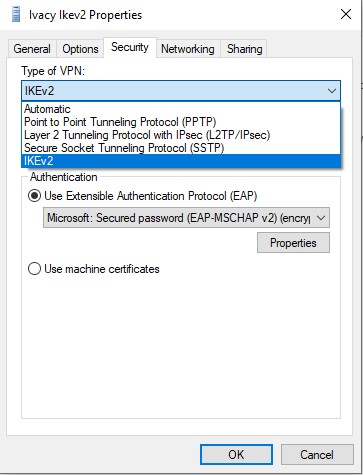
- Go to ‘Networking’ tab.
Uncheck ‘Internet Protocol (TCP / IPV6)’ option; and ‘File and Printer Sharing for Microsoft Networks’ option.
Keep the other two options; ‘Internet Protocol (TCP / IPV4)’ and ‘Client for Microsoft Networks’ checked.
Click ‘OK’. - In adapter settings, you will see ‘Ivacy IKEV’ icon. Double click on that particular icon.

- A new window will open up. Type in the ‘Username / Email’ and ‘Password’ in the two fields and Click Connect.

That’s it! You have successfully configured Ivacy VPN on your Windows 7. Enjoy complete privacy with Ivacy.